Teacher Activities
A partial listing of the teacher activities is contained
here.
2-2) Rising Air Bubble Expansion
- Material: Tall bottle of cooking oil, 1-m long plastic
tube (small diameter). The cooking oil bottle can be plastic or
glass, but it must be clear and as smooth as possible with few
curves, so bubbles can easily be seen inside. The taller the
better.
- Push one end of the tube almost to the bottom of a clear
bottle of cooking oil. Very slowly blow a bubble from the tube
that emerges at the bottom of the bottle. Watch the bubble closely
as it rises through the oil. The bubble should get slightly larger
due to the decrease in pressure from the bottom to the top of the
cooking oil bottle. A bubble of air rising through the atmosphere
will become larger for the same reason.

2-5) Sucking a Balloon into a
Flask
- Material: balloon, 150-400 ml Erlenmeyer glass flask,
water, and a hot plate or burner or microwave oven.
-
- 1. Pour water to about 1 cm depth into the flask and bring to
a boil by heating it over a hot plate or burner or by placing
inside a microwave oven. Make sure the flask has a fairly small
opening and is made to be heated. Wear safety glasses for this
experiment.
- 2. Let the water boil for at least a half minute, remove from
the heat, and quickly place a balloon over the flask's opening. Be
careful not to burn yourself.
- 3. Set the flask aside and let it cool. Predict what will
happen to the balloon.
- 4. After a few minutes the balloon should be sucked inside the
flask. While boiling there was mostly only water vapor inside the
flask, no air. After the balloon was placed over the opening, the
water vapor condensed back to water, creating a partial vacuum
inside the flask. The atmospheric pressure pushed the balloon
inside the flask and even inflated the balloon somewhat.
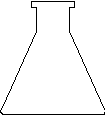
- Erlenmeyer Flask
QUESTIONS/CONCLUSIONS
- 1. What was inside the flask when you started heating it?
- 2. What was inside the flask while the water was boiling?
- 3. What was inside the flask after the flask cooled for a few
minutes?
-
2-6) Collapsing a Plastic
Bottle
- Material: 2-L plastic soda bottle, hot water, funnel,
basin, large bowl, ice water.
- Bring about a liter of water to a boil and carefully pour the
water using a funnel into the plastic bottle. Do this over a basin
or sink so as not to make a mess. Immediately cap the bottle.
Predict what will happen if you now place the plastic bottle in a
large bowl full of ice water. You may need to immerse the plastic
bottle in the cold water or pour ice cold water over the bottle if
the bowl is not large enough.
QUESTIONS/CONCLUSIONS
- 1. Why do we need to use a plastic bottle for this experiment?
- 2. What is inside the plastic bottle when we screw the cap on
tight?
- 3. Why does the plastic bottle collapse when it is placed in
the bowl of ice cold water?
- 4. What is inside the plastic bottle after it collapses?
-
2-11) Building a Balloon (aneroid)
Barometer
- Material: large wide-mouth jar (preferably glass,
perhaps a pickle jar), large balloon, 3 straws, straight pin,
tape, rubber cement, thermometer, poster board.
- 1. A gallon jar is preferred, but a smaller one will work.
Glass is slightly preferred over plastic so it will not deform.
Clean and dry the out the jar.
- 2. The balloon must be large enough to cover the top of the
jar. Try to blow up the balloon a few hours or a day in advance to
allow the rubber to stretch.
- 3. Cut the neck off the balloon. Spread rubber cement over the
outside of the jar opening. Stretch the balloon over the opening
and pull down over the jar against the rubber cement. Add a couple
of strong rubber bands to hold the balloon. It is okay for the
balloon to hang down, but you want to make an airtight seal.
- 4. Tape one straw vertically to the side of the jar so it
sticks up 3-4 cm above the opening.
- 5. Insert one straw well inside the other one making a
long pointer. We want a pointing indicator at the end of the
straw. This can be done by cutting off the straw with scissors at
a slant or by taping a straight pin or toothpick to the end.
- 6. Put some household glue at the center of the balloon and
spread out a bit towards the vertical straw. Place the other end
of the two straw length down on the glue so that the end of the
straw is open at the center of the balloon and the straw rests
against the vertical straw. You may want to put a piece of tape
over the horizontal straw to hold it down on the balloon.
- 7. Stick a straight pin through the intersection of the
vertical and horizontal straws. This will act as a pivot for the
horizontal straw to rotate.
- 8. Tape a thermometer to the side of the jar to record the
temperature.
- 9. Near the end of the horizontal straw place the poster board
in a vertical position. You may want to cut a narrow strip and
tape it to a ruler and attach it to something to hold it steady.
You will want to adjust the poster board so that you can easily
mark the position of the straw pointer on it once or twice a day.
- What happens? As the atmospheric pressure changes, the balloon
deflates or inflates moving the pointer straw.
QUESTIONS/CONCLUSIONS
- 1. Why does it help to prestretch the balloon?
- 2. Why is it necessary for the temperature to be constant?
- 3. Why should the barometer be placed inside the house rather
than outside?
- 4. How can you determine an absolute barometric pressure?
- 5. Does the pointer move up or down when the pressure changes?
-
3-4) Does Soil Absorb Heat Faster Than
Water?
- Material: two plastic cups, sandy soil, water, two
thermometers.
- The amount of heat energy that a material must absorb to raise
its temperature 10C is called the material's heat capacity. This
quantity may vary considerably among different materials and can
have a large effect on the weather.
- 1. The procedure is much like Experiment 3-3. The light soil
is probably sand, so let's compare it with the water. Make sure
the soil is dry. Fill up both cups, one with water and one with
sand. You may need to wait until they both come to the same
equilibrium temperature.
- 2. Put a thermometer in the middle of each sample, just
sticking the bulb about a cm into the surface until the bulb is
completely covered. You may need to prop up the thermometers or
tape them to a backdrop to keep them from toppling over.
- 3. Check and write down the starting temperatures of both
samples.
- 4. Bring up the 100 W lamp and place it equally distant from
both cups and about 10 cm from each. When you turn on the lamp,
start your timing.
- 5. Take a measurement from each about every 2-3 minutes for
about 30 minutes and compare the results.
QUESTIONS/CONCLUSIONS
- 1. Why did we stick the thermometers barely into the
soil/water?
- 2. Why is it important to use dry soil, free of moisture? (It
might even be necessary to bake the soil for awhile to remove the
moisture).
- 3. Which sample had the fastest temperature rise: soil or
water? Explain.
- 4. Can you think of how this experiment might be important in
creating wind?
-
6-3) Is High Humidity Comfortable?
- Material: plastic bag, tape
- 1. Take a one gallon plastic bag and put one of your hands in
it. Put tape around the bag around your wrist so that no air can
get in. Wait a few minutes.
- 2. Put warm water on your other hand.
- 3. What do you feel?
Conclusion: Even though both hands are wet, the one inside the
plastic bag feels sweaty and uncomfortable. The hand with warm water
feels better, because the warm water is evaporating making your hand
feel cool. The hand in the bag, however, is sweating, but the water
can not evaporate, because the humidity is too high.
6-5) How Evaporation Cools
- Material: two plastic cups, rubbing alcohol, water,
thermometer, absorbent cotton.
- Experiment A
- 1. Wrap a small piece of absorbent cotton (shoelace, old T
shirt, cotton ball, etc.) around the bulb of a thermometer. Note
the temperature.
- 2. Moisten the cotton with water. Fan the cotton for a couple
of minutes. Observe the thermometer temperature again and note
that it has dropped!
- Experiment B
- 1. Put about 50 cc of water in one cup and 50 cc of rubbing
alcohol in another cup. Which evaporates first?
- Experiment C
- 1. Wet one of your hands with a little rubbing alcohol and wet
the other hand with water.
- 2. Wave your hands around in the air. Which feels cooler? (the
one with alcohol)
- CONCLUSIONS
- When a substance like water changes from the liquid to the
vapor phase, we say it evaporates. It takes energy to cause this
process to happen. This energy comes from the surroundings in the
form of heat loss and is called the heat of vaporization.
Therefore, in each case, the thermometer or the hand feels cooler
while evaporation takes place, because it is giving up heat. The
heat of vaporization of alcohol is about half that of water at 200
C, so rubbing alcohol evaporates more readily than water, thus
cooling its area quicker. On the other hand, the cooling effects
of water remain long after the alcohol has all evaporated.
6-6) Condensation of Water, part A
- Material: tin can, ice, food dye, bowl
- 1. Take a tin can with its label removed, fill about halfway
with water and add a couple of drops of food coloring dye. Then
fill up with ice.
- 2. Set the tin can in a bowl and wait a few minutes. Water
collects on the side of the tin can, and it must be coming from
the air, because the water is not the color in the can.
-
- CONCLUSION
- We say that water is condensing from the air. The process of
condensation is the opposite of that of evaporation. Cooler air
can hold less water vapor, so the cool air around the can must
give up some of its water vapor in the form of liquid, so water
condenses onto the side of the can. The tiny droplets that form at
first eventually coalesce into larger drops that run down the side
of the can.
6-7) Condensation of Water, part B
Material: cup or glass, ice.
- Outside on a cold day you often see your breath turn into a
white mist that looks somewhat like a cloud. This is because your
breath is warm and it can hold more water vapor than the cold air
outside. Some of the water vapor in your breath quickly condenses
out into tiny water droplets that you can see.
Let's see if we can duplicate this effect inside.
- 1. Take a short glass or plastic cup and put ice in it,
filling it no more than halfway.
- 2. Gently blow across the top of the glass or even slightly
down into it until you see your breath making a white mist. If you
are unable to see a white mist, go to step 3.
- 3. Sprinkle some rock or table salt into the ice and mix it up
a little and repeat step 2.
QUESTION
If step 2 didn't work, why did adding the ice in step 3 help?
6-10) Measuring the Dew Point
- Material: tin can, water, ice, thermometer
- 1. Take a dry, clean tin can and fill it about 1/3 full of
cold water. Add a spoonful of crushed ice and stir with the
thermometer.
- 2. Note the temperature on the thermometer often as you stir.
When you first observe moisture condensing on the outside of the
can that temperature is the dew point. If this does not occur, add
some more crushed ice and keep stirring.
-
QUESTIONS/CONCLUSIONS
- 1. What does the dew point mean?
- 2. Why must we continuously stir?
- 3. Why do we want to start with a dry can outside?
- 4. By how many degrees would the air have to cool in order to
reach the dew point you just measured?
- 5. When would the air temperature and the dew point be the
same?
- 6. What time during the day are you most likely to see dew?
Why?
- 7. Where are you most likely to see dew?
-