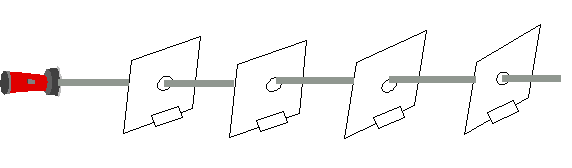
Material: flashlight, 4 - 3" x 5" index cards, white
supports, flexible soda straw.
1. Punch a small hole in each of the index cards at precisely
the same position.
2. Stick each card into a white support to hold the card
upright.
3. Place the cards about 15 cm apart with holes in a straight
line.
4. Shine the flashlight so that the light travels through the
hole in each card.
5. Move one of the cards a little and observe if the light
passes through.
6. Now try looking through the flexible straw while it's
straight at a light source at eye level.
7. Bend the straw and look at the same source.
QUESTIONS/CONCLUSIONS
1. Look down the cards when the light is passing through all
the cards. Are the holes lined up in a straight line?
2. What happened when you moved one of the cards a little?
3. Can we conclude that light travels in a straight line?
4. Did you see light come all the way through the straw after
you bent it?
2) Creating Shadows
Material: Flashlight, construction paper, scissors,
popsicle stick.
1. In a darkened room shine a flashlight towards a blank wall.
2. Using your hands, see how many different sensible shapes
and figures you can make.
3. Cut out some figures from construction paper and tape them
to a popsicle stick.
4. Move them closer and farther away from the flashlight.
QUESTIONS/CONCLUSIONS
1. Where is it darkest in your shadow? Why?
2. What happens to your shadow when you move your hands or
cutout closer and farther from the flashlight?
3) Measure the Diameter of the Sun.
Material: Pinhole on large dark paper, measuring stick,
posterboard screen.
1. Pinhole patterns can be used to estimate sizes or
distances.
2. Go outside on a clear day with a posterboard screen,
measuring stick, and a pinhole on large dark paper. The pinhole
may need to be made with a nail instead of a pin.
3. Put the screen on the ground, and hold the pinhole above
the screen, but facing the sun. Move the pinhole towards the
screen and away from it until you see a fairly clear image of the
sun on the screen (the image won't be that large).
4. Measure the size of the image and the distance between the
screen and the pinhole.
5. Knowing that the distance between the Earth and the Sun is
approximately 1.5x10¹¹ meters (150,000,000,000 m), calculate the
diameter of the sun.
QUESTIONS/CONCLUSIONS
1. Why does the size of the image change as you move the
pinhole up and down?
2. What is the relationship between the angle formed by the
sun's diameter with respect to the pinhole and the angle formed by
the image diameter on the screen with respect to the pinhole.
3. What method did you use to determine the diameter of the
sun?
4. Compare your experimental result to the sun's diameter.
8) Disappearing Glass
Material: large and small glass beakers, Wesson oil,
glass rod, other items made of glass.
1. Place the small beaker inside the large beaker.
2. Fill the large beaker about 3/4 full of Wesson oil. Observe
what happens to the small beaker as the oil covers it.
3. Observe what happens as you place other pieces of glass
into the beaker of oil.
QUESTIONS/CONCLUSIONS
1. Why do the objects disappear as they enter the oil?
2. What would happen if you used water in the beaker instead
of oil?
9) Refractive Properties of Water
Material: Clear skinny plastic cup, pencil, empty short
jar, sticker.
1. Fill cup 2/3 full with water.
2. Put the pencil in the water.
3. Look at the pencil from the top and the side.
4. Now place the sticker on a table.
5. Fill the jar completely with water and place it over the
sticker.
QUESTIONS/CONCLUSIONS
1. What appears to happen to the pencil at the water level?
2. What happened to the sticker when the jar was placed over
it?
3. What ideas do you have about these effects?
12) Water Drop Magnifier
Material: 10" long #22 bare wire, nail, water.
1. Wrap one end of the wire tightly around the nail. Twist it
a couple of times so it is tight.
2. Carefully pull the wire loop off the nail. Dip it in a cup
of water so that water collects in the loop.
3. Use the wire loop as a magnifier to read small letters.
4. Try to place more or less water on the loop and try to read
the letters again.
QUESTIONS/CONCLUSIONS
1. Does the water in the loop act as a magnifier?
2. Does the water with more or less water behave as the better
magnifier?
3. Explain why the water acts as a magnifier?
4. Is this a concave or convex lens?
19) Pouring Light with Water
Material: soda can, flashlight, tape, nail, water,
water collector.
1. Use a can opener to take off the lid of the soda can that
has the pull-tab. Clean out the inside of the can.
2. Use the nail to make a hole in the side of the soda can
near the bottom of the can.
3. Put a piece of tape over the nail hole. Fill the can almost
full of water.
4. Place a flashlight on top of the open can with the light
pointing towards the bottom. It might be helpful to tape the
flashlight in place using black electrical tape or duct tape.
5. Place the can over a dish or bucket to catch the water.
6. Turn out the room lights and turn on the flashlight.
7. Hold the can above the collector and take off the tape
letting the water pour out slowly into the dish.
QUESTIONS/CONCLUSIONS
1. What do you observe happens in the stream of water?
2. Why does the light appear in the water stream?
3. Can you think of any application of this technique?
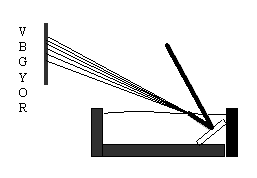
20) Water Prism
Material: shallow dish, mirror, white paper, light
source.
1. Fill the dish almost full of water and place the mirror in
the water at an angle.
2. Face the mirror towards sunlight coming through the window
or use a strong source of light (slide projector or good
flashlight) to shine through the water onto the mirror. Outside in
full sunlight works best.
3. Put the white paper in a position to catch the reflected
light. Move the paper around and at an angle until you see a
rainbow of colors. You may also have to change the angle of the
mirror.
QUESTIONS/CONCLUSIONS
1. Explain the order of the colors. Which ones are at the top?
2. Why do we see colors?
3. Does the mirror have to be in the water in order to see
colors?
4. Does this have anything to do with rainbows that we see
when it rains and the sun is shining?