|
|
UVa Physics Computer Facilities
|
Using Davmail to Connect IMAP Clients to Office365
About Davmail
If you need to use Thunderbird, Pine, or another IMAP-based mail client at UVa, you'll need to install and configure davmail as described below.
Davmail is a proxy server that runs on your computer and allows IMAP and SMTP clients like Thunderbird to connect to Office365, even if the connection requires Multi-Factor Authentication (MFA) such as Duo.
After installing and configuring davmail as described in the following sections, see instructions at this link to configure your e-mail client:
http://galileo.phys.virginia.edu/compfac/faq/imap-office365-mfa.html
- Installation:
- For CentOS Linux you'll need to fetch the davmail zip file from Sourceforge:
https://sourceforge.net/projects/davmail/files/davmail/5.3.1/davmail-5.3.1-3079.zip/download
After downloading the zip file, create a directory to hold the extracted files, and extract them there. This directory can either be in your own home directory or a system directory. For example:
mkdir ~/davmail
cd ~/davmail
unzip ~/Downloads/davmail-5.3.1-3079.zip
You'll also need java. I've had good luck using davmail with Oracle JDK 8 under CentOS. You can download this here:
https://www.oracle.com/technetwork/java/javase/downloads/jdk8-downloads-2133151.html
To run davmail, find the file named "davmail" in the directory where you unpacked the zip file and type its name. For example:
~/davmail/davmail
Note: If you use the XFCE desktop environment, make sure your panel has the "Notification Area" item displayed. This will be where the davmail icon appears while it is running.
- For Ubuntu Linux you'll need to fetch the davmail deb file from Sourceforge:
https://sourceforge.net/projects/davmail/files/davmail/5.3.1/davmail_5.3.1-3079-1_all.deb/download
After downloading the file, install it by typing:
sudo dpkg -i davmail_5.3.1-3079-1_all.deb
You'll also need java. I've had good luck using davmail with the default JRE under Ubuntu 18.04. This can be installed by typing:
sudo apt install default-jre
To run davmail, just type "davmail" at the command line, or click its icon on the application menu.
Note: If you use the XFCE desktop environment, make sure your panel has the "Notification Area" item displayed. This will be where the davmail icon appears while it is running.
- For Windows you'll need to fetch the davmail setup.exe file from Sourceforge. There are two versions of this, one for use with 32-bit java and one for 64-bit java:
You'll also (of course) need to have java installed. I've had good luck using davmail with the standard java version we use at UVa that's compatible with the Integrated System.
During the process of installing davmail, an icon will be created on your desktop. Double-click this to start davmail.
Important Note: If you install davmail as an administrator and run it as part of the installation process, any configuration changes you make will be saved for the administrators account. If you're installing it for an unprivileged user, this might not be what you want. Instead, install davmail as an administrator, and then run it as the user who'll be using it.
- For Mac OS X fetch the app.zip file from Sourceforge:
https://sourceforge.net/projects/davmail/files/davmail/5.3.1/DavMail-MacOSX-5.3.1-3079.app.zip/download
Follow instructions here for installing it:
http://davmail.sourceforge.net/macosxsetup.html
- Configuring Davmail:
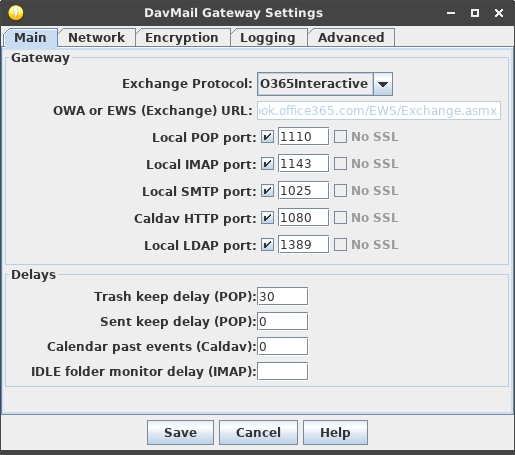
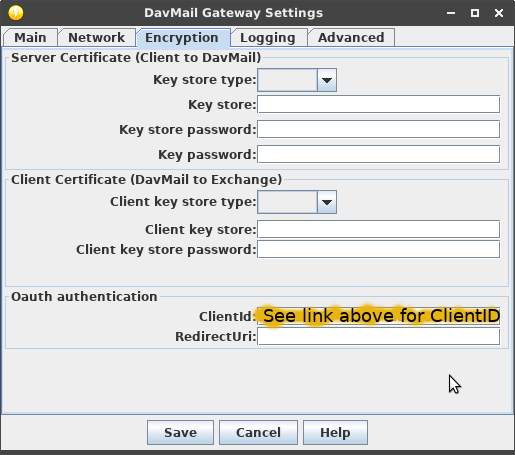
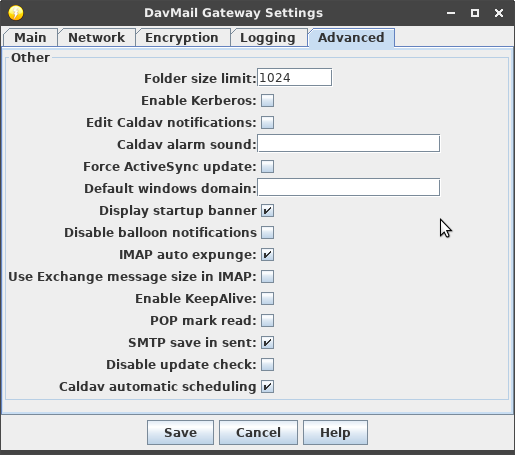
Start davmail. The first time you run it, it will pop up its settings window. Configure it as shown in the following screenshots.
In the "Main" tab, set the Exchange Protocol to "O365Interactive":

In the "Encryption" tab, enter the ClientID. The ID can be found at the link below, after logging in through NetBadge:
https://web.phys.virginia.edu/Private/office365-mfa-ids.html
Note that you should use the client (AKA application) ID, not the tenant ID.

If you have folders with many messages, you might want to set the "Folder Size Limit" in the "Advanced" tab initially. Setting this to 1024, for example, will cause davmail to only fetch the latest 1024 messages from each folder:

After changing these settings, click the "Save" button at the bottom of the window. This will save your settings into a file named .davmail.properties in your home directory (Linux, OS X) or davmail.properties at the top level of your profile (Windows).
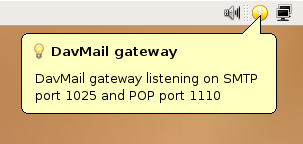
Davmail should now appear as a small yellow circle on your task bar. You can change its settings later by right-clicking on the circle and selecting "Settings".

After its icon appears, davmail is ready to accept connections from mail clients like Thunderbird or Pine.
|
|


