
|
|
UVa Physics Computer Facilities
|
Setting up the Physics Department printers on your computer:
The physics department maintains three public printers/scanners/copiers.
Each of these is a Xerox WorkCentre 7970. Two of the devices also
have fax capabilities:
| Name |
Location |
Address |
Print |
Photocopy |
Scan |
Fax |
| copier_315 |
Behind 3rd Floor Common Area |
172.29.36.73 |
yes |
yes |
yes |
no |
| copier_hep |
HEP Building |
172.29.233.145 |
yes |
yes |
yes |
yes |
These printers are already defined on standard department computers, but you
can configure your own computer to use them too. (See here
for information about using the printers after you've configured your computer.)
Microsoft Windows:
Note 1: The following is for 64-bit Windows only. If you need to print from 32-bit Windows, please
contact Bryan.
Note 2: The following will not work for Windows 10 Home Edition. If you need to print from Windows 10 Home Edition, please
contact Bryan.
- Download and run the following setup file:
http://galileo.phys.virginia.edu/compfac/faq/printer_drivers/setup.exe
This will install the appropriate printer drivers and connect your computer to any or all
of the three physics department printing devices.
Linux:
- Download a printer driver package for the appropiate Linux distribution. Note that version 5.20.602.3898 of the drivers does not work properly on some computers. If you have problems with this
version, please download an earlier one. Drivers can be found here:
http://www.support.xerox.com/support/workcentre-7970/downloads/enus.html?operatingSystem=linux
- Install the package using your distribution's package management tools.
- Download the printer setup script here:
http://galileo.phys.virginia.edu/compfac/faq/printer_drivers/makequeues.sh
- Run the script as root by typing "sh makequeues.sh" or through sudo by typing "sudo sh makequeues.sh". This will create
three new print queues on your computer: copier_100, copier_315, and copier_hep (see the table at the top of the page).
Apple OS X:
There are two ways to set up these printers under OS X.
Option 1:
If you don't need access to all of the printer's advanced features, you can set the printer up as a generic postscript LPD printer.
You'll actually want to create two separate "printers" on your computer, one for black-and-white and one for color. Here's how
to do it:
- Click on the "Printing" tab in System Preferences --> Print and Scan and then click the "+" button, "Add Printer or Scanner ..."
- Select the "IP" tab.
- For "Address" enter "print.phys.virginia.edu".
- For "Protocol", choose "Line Printer Daemon - LPD".
- For "Queue" enter the appropriate name from the table at the top of this page (e.g., "copier_100" for the printer in room 100.)
- You can then give the printer a name (e.g., "Printer in Physics 100") and give location information, if you want.
- Under "Use", choose "Generic Postscript Printer".
- Click "Add"
- Check the box labeled "Duplex Printing Unit" on the "Setting up ...'" window.
- Now repeat steps 1-9, adding "_color" to the end of the Queue name in step 5 (e.g., "copier_100_color" for the printer in room 100.)
Option 2:
If you need access to the printer's advanced features, you'll need to install the appropriate Xerox driver and configure it
properly. Here's how to do that:
- Download a printer driver for the appropriate version of OS X from here:
http://www.support.xerox.com/support/workcentre-7970/downloads/enus.html?operatingSystem=macos1012&fileLanguage=en
- Install the driver by double-clicking on the downloaded file, then double-clicking on the package enclosed within it.
- During the installation you'll be shown a list of discovered printers, like the one below. In parentheses in each printer's
description you'll see an address beginning with 172.16. Use this address and the table above to select the printer you want to use.

- After completing the driver installation, you'll need to set the printer's default behavior. In particular, you'll
need to make sure that you're asked for your copy code when you print something (otherwise, the printer will reject
your job). This can be done through your printing system's web-based CUPS interface, which first
needs to be enabled. To do this, go to Applications -> Utilities in the Finder menu and start
the "Terminal" application. Inside the resulting terminal window, type "cupsctl WebInterface=yes".
- Now start Safari and go to http://localhost:631/printers.
You should see a page similar
to the one below, showing at least one printer. Click on the name of the Xerox printer (it might be different
from the name shown in the illustration).

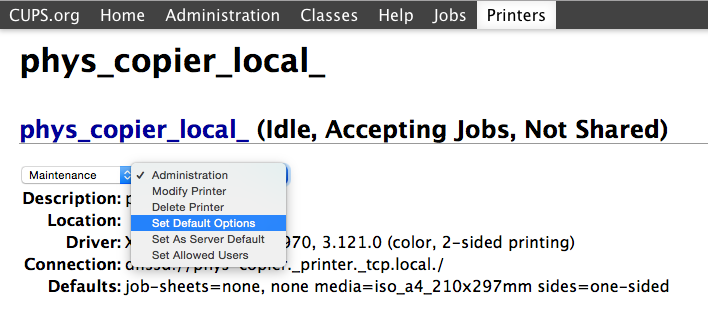
- On the resulting page, click the drop-down menu that says "Administration" (not the one in the black bar at the top!)
and change it to say "Set Default Options".
- Click "Advanced":
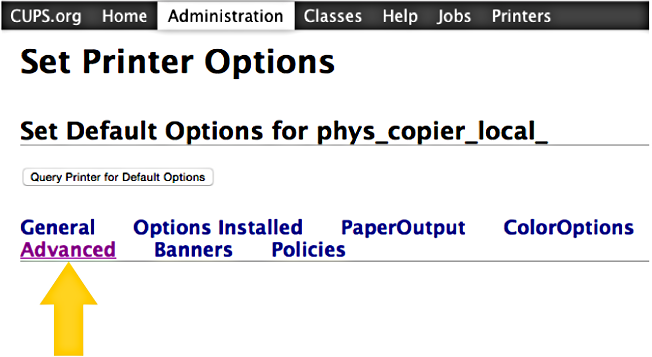
- Change the settings to match those shown in the red box in the illustration below, then scroll down to
the bottom of the page and click "Set Default Options". You might be asked to supply your password in
order to make the changes.

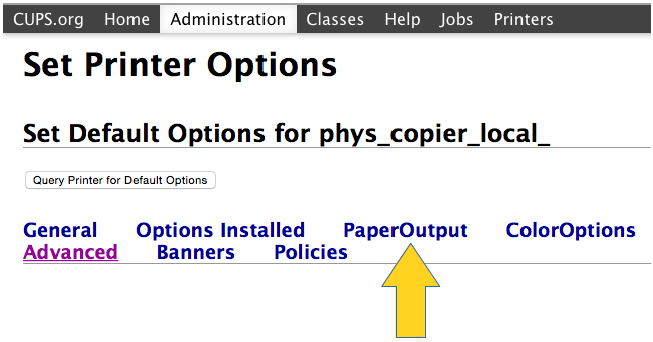
- Now go back to http://localhost:631/printers. Click on the name
of the Xerox printer again. Once again, select "Set Default Options" from the "Administration" drop-down menu.
Now, instead of clicking "Advanced", click on "PaperOutput".
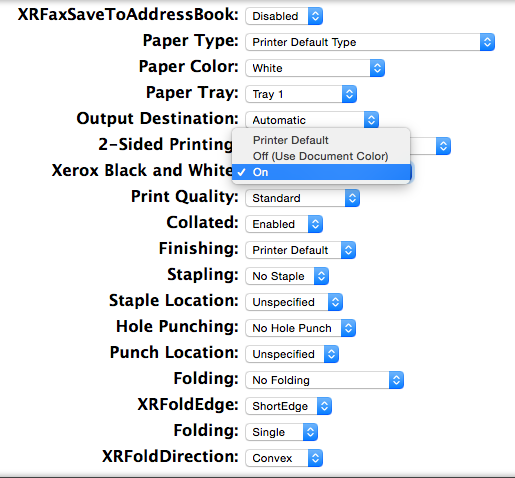
- Scroll down to the option labeled "Xerox Black and White" and set this to "on", then scroll down to
the bottom of the page and click "Set Default Options". You might be asked to supply your password in
order to make the changes.
|
|